Olan Suddeth
Dad. Computer geek.Homebrewer. Disney nut.
Would-be crafty guy.

Amazon
Save Money
Ibotta
Fetch Rewards
(use code "116YB")


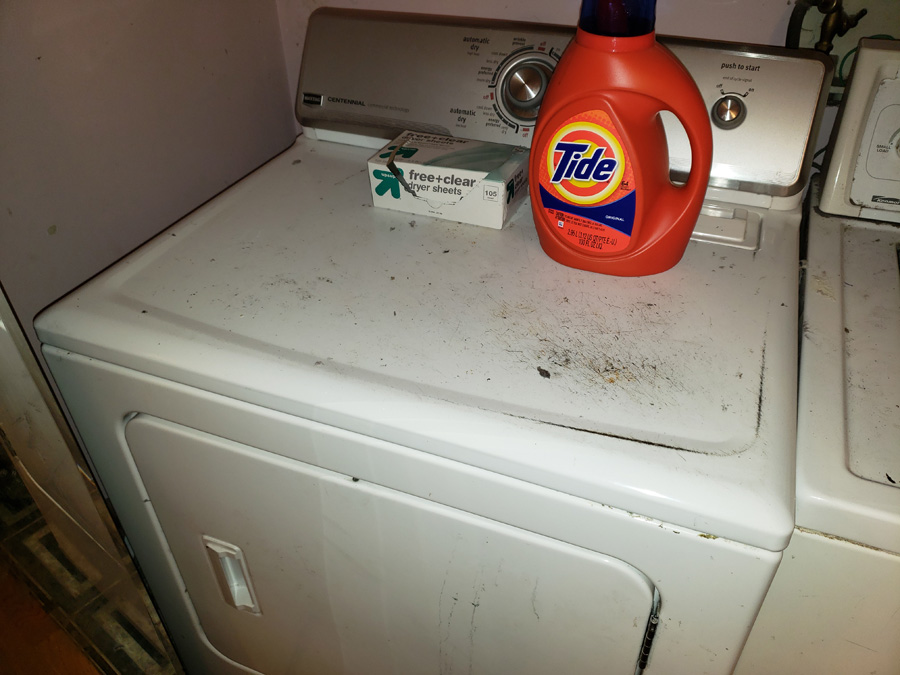
Our old electric Maytag clothes dryer.
This, ladies and gentlemen, is in fact an old electric clothes dryer. It has been well used, as the scratches and such on top can attest. If you look at this picture and think something along the lines of "old piece of junk"... well, I can both understand and forgive that.
We've had this dryer for at least ten years, now... it may actually be closer to fifteen. We did not purchase it new; this was a newspaper want ads special (which should help date its age) that we bought when our first dryer died, and we simply did not have the cash to spring for a brand new one.
It is, however, a Maytag, and has been very reliable for the time we have owned it. I think the worst problem that we have dealt with for most of the time has been an odd propensity to toss lint inside of our laundry closet. Donna used to bug me about fixing that; one day, I replaced the flexible exhaust vent ducting and put proper hose clamps on, and that helped a lot.
Over time, the dryer has lost some power. It's been a slow creep, where loads weren't all the way dry, so we'd run them again. Heavy loads like towels would take even longer... but much like you slowly raise the temperature on the frog so that he won't jump straight out of the pot, the decay of the dryer's power was slow enough that we weren't thinking a lot about it until we were running clothes for three and four cycles.
We actually looked into replacing the dryer about a year ago, but didn't pull the trigger. Then, in December, it started making a terrible noise. Here we were, at the tightest time of the year financially, without a working dryer. I did some looking, saw that these older dryers were apparently easy to work on, and found that the parts I would need would be less than $20 online. So I gave it a shot, replaced the rollers, and got it working again - albeit with a new odd noise (a rhythmic click clack, like a train rolling by)... and still taking way too many cycles to dry. I planned to take it apart and see if the rollers needed adjusting or whatever, but it was working, Christmas was almost upon us... I didn't get around to opening it back up.
This past spring, we looked at dryers again. I was reluctant to invest the $600 or so that a good new dryer would cost, but Donna was frustrated - she just wanted something that worked. We looked at used dryers again, and I got to talking with a guy that buys and refurbishes dryers... when he found out what I had, he was excited to take it off my hands - or to fully refurbish it for me.
I got to doing my homework, and found that I could replace virtually every part in the dryer for less than $200, and learned that old Maytags like this are widely regarded as superior to even brand new models due to the ease of repair and the quality of the workmanship. Donna was okay with me refurbishing it if that's what I wanted to do - again, she just wanted a working clothes dryer. So I resolved to do just that... and promptly neglected to follow up and do so. This expense and that expense came up, I was coaching little league, I had this birthday party or that event, just couldn't seem to find the time. Oh, I was going to fix it when I got the time... you know where this is going.
Late last Thursday night, I started a load of clothes in the dryer. It ran for about ten minutes, then started making a horrible loud thumping noise like I had left shoes in the dryer.
There were no shoes.
Panic hit. Was it time to scrap the dryer? Was it worth trying to repair it again?
At first blush, I was looking at rollers as the culprit again - but I couldn't see how rollers with less than a year on them had gone that bad already. A little more digging led me to the blower fan as the real problem. Apparently, a noisy dryer that requires multiple runs per load were warning signs that the blower fan was dying, and when it does go, there are very distinctive noises; if it sounds like a galloping horse or shoes in the dryer (ding ding ding!), the blower fan is the likely cause.
After Googling, I found that I could get a replacement fan for $10, and figured that it was worth that to see if I could save the dryer. Then, on Donna's suggestion, I checked Amazon - and lo and behold, they had the fan for my dryer, with Prime shipping, for the same price... and it would be to my house by Monday. Donna wondered if I shouldn't just do the entire refurb in one sitting, but I wanted to make sure that fixing the part that I "knew" was bad would solve the problem - I felt that there was no need to replace the heating element, the main seal, the drive shaft, etc if this didn't help.
Monday came, and so did the blower fan. That evening, I got to work.
- Step 1: unplug the dryer and scoot it out.
- Step 2: remove the lint screen.
- Step 3: remove the two screws inside the lint screen socket.
- Step 4: use a pocket knife to pop the dryer top up in the front (there are clamps at the corners). Tutorial videos suggest a putty knife, but my pocket knife did just fine. Tilt the top back.
- Step 5: disconnect the wire harness on the inside front of the dryer.
- Step 6: lift the front of the dryer up and off, set it to the side.
- Step 7: get under the drum, slide the tension pulley to the right, remove the belt from the rollers.

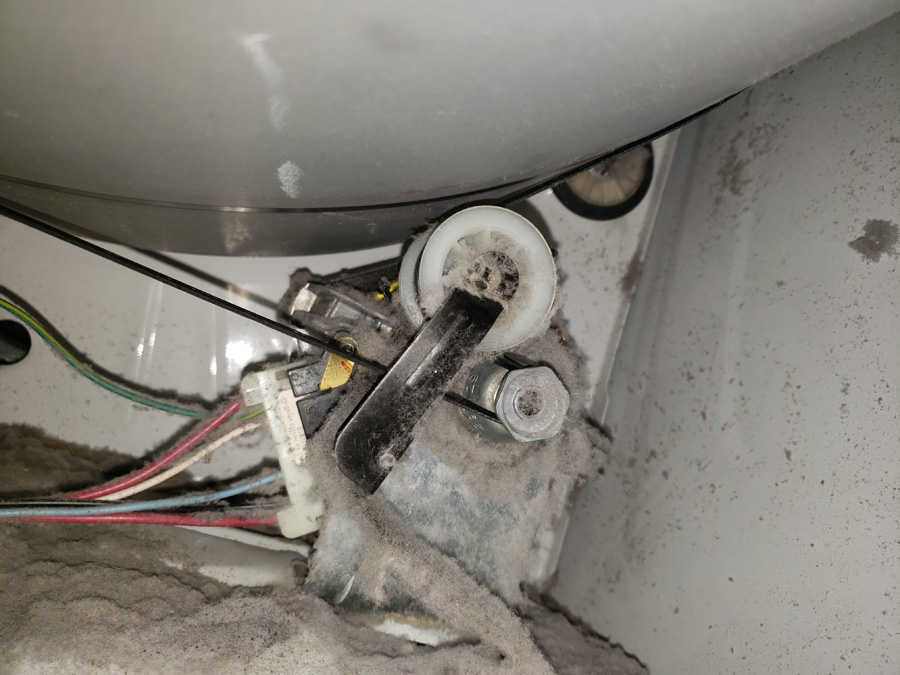
My horribly lint-covered rollers.
- Step 8: pick the drum up by the belt, set it aside.
- Step 9: freak out at just how much lint is covering every crevice of the dryer's guts.
- Step 10: grab the vacuum and a trash bag, start cleaning the dryer out.
- Step 11: realize that the blower fan barely turns because lint and junk is stuffed in it, not because it is broken.
- Step 12: discover that the exhaust pipe is basically solid lint and junk.
- Step 13: spend the next hour plus cleaning lint until you have several POUNDS of it in your trash bag.
- Step 14: reassemble the dryer, going in reverse order from steps 8 to 1.
Now, it needs to be recognized that Donna has told me several times that she felt the lint situation wasn't right, that I should check it, etc. To be fair, I have checked it in the past, and it looked normal.
This was not normal. This was a terrifying abomination that we are extraordinarily lucky did not result in a fire.
Clearly, I did not check it well enough.
It appears that some larger trash - a couple of drywall screws, a nail or two, a broken pencil or two, various BBs and such - made it past the various screens to get stuck around the blower fan, in the internal ducting, in the external dryer ducts. Over time, other trash and lint stuck to them until things got really blocked up, and the lint started backing up in the dryer to the point that hot air couldn't flow properly, the parts couldn't work properly, and so forth.
At around 10 PM - after about two hours of tinkering with the dryer - I was done and it was reassembled. I plugged it in, crossed my fingers, and pushed the start button...
Eureka! Not only did the dryer work, it was incredibly QUIET. And when I opened the door to stop it, I was astonished at just how HOT it was inside, even on "low" heat.
So we laundered a large load of the boys' clothes as a final test. Lo and behold, the dryer again ran very quietly, and the clothes were thoroughly dry - after one lone cycle.
Ladies and gentlemen, my dryer is fixed, and as old and ugly as it might look, it runs fantastic. I'm returning the new blower fan, since I didn't even need to take it out of the box.
It may not be pretty, but I'll just close the laundry closet doors and celebrate that it's fixed for the cost of a little time and effort - and a few drops of blood, where I cut myself on some of the junk I was cleaning out. I believe that I'll hold on to this old dryer for a while, yet.
Tags for this post: DIY
Permalink
Please share this post!


If you enjoy HomeBrew Dad, please support the site by using my Amazon affiliate link when doing any shopping there. All prices are exactly the same, but HomeBrew Dad will receive a commission on your purchases. Thanks!
